|
|
||||||||||||||||||||||||||||||
|
||||||||||||||||||||||||||||||
 |
 |
|||||||||||||||||||||||||||||
|
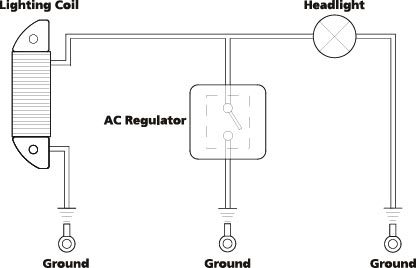
Technical Article: AC Lighting ConfigurationAC Lighting - Adding a simple headlight and taillight on your dirtbike.Follow a few basic guidelines and avoid a headaches. Bikes that don't come with a lighting coil will need to have one installed. Depending on the model you can add a lighting coil to the existing baseplate next to the ignition source coil, or you will have to replace the whole source coil (stator) with a new one that has a lighting winding built in. Most importantly: follow the instructions that come with the part, and make sure the connections you make are perfect. Lighting Configuration The most basic lighting setup consists of a lighting coil, an AC regulator and the light itself. The lighting coil is nothing but a long piece of copper wire wrapped around an iron core. Due to a varying magnetic field through the core the copper wire will generate electricity. That variation in the magnetic field is generated by a flywheel with magnets on the inside, which rotates around the lighting coil. The coil is connected to the bikes ground on one side. The other side of the coil has a (usually yellow) wire, which will be connected to one side of the headlight. The other side of the headlight hooks up to ground. The ground connection closes the loop back to the lighting coil. Problem is now, that the coil will have an output voltage that is related to the rpm of the engine. The higher the engine is revved, the higher the voltage generated by the coil will be (technically this is not quite true, self inductance and DC resistance in the coil will limit the output at higher rpm, but that is beyond the scope of this story). There is another problem to deal with. If you hook up a larger load to the coil (a higher wattage bulb) the output voltage of the coil will go down. If you hook up a load that is smaller than the output of the coil, the voltage will go over 15Vac at higher rpm, blowing the headlight bulb. The bulb in the headlight is normally a 12V type, which is going to be nice and bright running at voltages between 13 and 14.5V. If you have a lighting coil that is capable of supplying 75W of power you will be able to run a 75W headlight bulb. However, this 75W of power is only available at a fairly high rpm. Running at lower rpms means that the voltage supplied by the coil is not high enough, resulting in a yellow candle like light. The answer is to run a lower wattage bulb than the rated power output of the lighting coil, along with a regulator that will limit the voltage in the system. The voltage regulator that you need to add basically works as an automatic switch to ground. As soon as it “sees” a voltage of more than 14.5V to ground, it will start “shorting” the excess power. The standard AC regulator is connected parallel to the headlight, in between the power lead from the coil and the ground. I normally recommend running a 50W headlight off of a 75W lighting coil together with an AC regulator. If you do a lot of low rpm riding (on difficult trails) you might even consider running a 35W headlight on the same 75W lighting coil. You will be amazed how much better it works! Again: ensure that all connections you make are good. Twisting two wires together does not work, you will have to use proper crimp terminals or solder the wires. Taillights can be hooked up parallel to the headlight; the bulb normally doesn't exceed 5W.  « Technical Resources Library :: Technical Articles
|
|||||||||||||||||||||||||||||
|
© 2010 - 2023 - www.Electronicamotos.com.ar - Buenos Aires - Argentina |
||||||||||||||||||||||||||||||


